D.R.S.A.B.C.D. – The Emergency Action Plan
The Australian Resuscitation Council state any attempt at CPR is better than no attempt at all. If a casualty is in cardiac arrest you can not do any further harm in your attempt to revive them.
Primary Survey
The D.R.S.A.B.C.D. or the emergency action plan is the protocol to follow in all emergency situations and allows a first aider to work through an emergency safely and systematically.
If the casualty is unconscious the first aider need only follow the D.R.S.A.B.C.D. emergency action plan and perform CPR if the breathing is abnormal.
If a casualty is conscious and able to communicate then the first aider should obtain a history of the incident from the casualty and bystanders by using S.A.M.P.L.E. and begin the secondary survey.
(D) Danger
In any emergency situation, it is important to initially confirm it is safe to approach a casualty. Is there any danger to you, bystanders or casualties? This initial survey of checking the scene for dangers should only take several seconds but can be life saving. At the scene of a serious incident the experienced first aider is the most important person and must ensure they are not injured as well.
Determining whether the scene is safe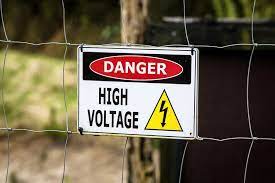
After identifying an emergency situation, prior to making direct contact with the casualty, it is important to assess the scene for danger to yourself, bystanders and the casualties. If it is safe to do so, remove the danger. If not, remove the casualty and bystanders away from the danger. If it is essential to move a casualty before an ambulance arrives, take extreme care and use good manual handling techniques.
First aiders must consider the setting in which first aid is to be provided including situational risks.
Potential hazards include but are not limited to:
Potential personal violence
Smoke, fire, fumes
Traffic dangers, on-coming traffic
Confined spaces, unstable structures
Electricity, electrical cords, fallen power lines
Sharps (needles or broken glass), sharp metal edges
Weather conditions, slippery/wet surfaces, fast flowing or deep water
Chemicals, flammable liquids, leaking fuel, risk of explosion, biological hazards
Leave dangerous situations to the emergency personnel who are trained and equipped to manage these situations. You do not want to become a casualty!
(D.R.) Response
Check the casualty’s level of consciousness (or response) by using ‘touch and talk’. On your approach if the casualty is a stranger first ask “Can I help you?”. You must attempt to establish consent for your legal protection, remember the injured casualty has a right to refuse your assistance. If the casualty is unconscious and a stranger; approach from behind and squeeze the shoulders or hold their feet to check for a response for your safety. DO NOT shake infants and children, and be gentle with all casualties. If you feel it is safe, kneel beside the casualty, take both hands in yours to check for paralysis, and speak to them in a loud voice.
When asking the casualty questions use the C.O.W.S. acronym, this is a method of “Touch & Talk”
Can you hear me?
Open your eyes.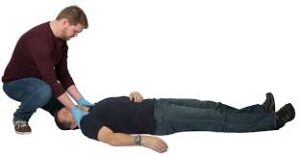
What’s your name?
Squeeze my hands.
Ask the casualty to squeeze both hands, as this can determine if there’s paralysis on either side of the body.
Responsive?
If the casualty responds by answering and appears conscious, leave them in the position in which you have found them, unless they are in danger or their airway is blocked by fluid and begin the secondary survey using the S.A.M.P.L.E assessment. ( See basic emergency flow chart)
S.A.M.P.L.E.
Signs are what can be observed and may include bleeding, bruising, swelling, skin colour, sweating. Symptoms are what the casualty can feel and may include nausea, dizziness, headache, confusion.
Allergies – allergic reactions can range from mild-moderate or severe. If there is a known allergy this could be why the casualty is unwell.
Medications – Names, doses, timing and last dose taken. Casualty’s may take a regular medication that may assist in their first aid management, for example ventolin puffer for asthma.
Past medical history – Previous illness or injury, some conditions like asthma or heart conditions can reoccur, likewise soft tissue injuries such as sprains and strains may happen more than once.
Last time they ate or drank – This is relevant for dehydration, blood sugar levels and cases of anaphylaxis. Important to handover to medical personnel if the casualty requires surgery.
Events leading to the incident– Understanding the events leading to the injury or illness. For example understanding how a casualty has fallen could help you to locate further injuries.
Check the casualty’s condition and send or go for help, or call 000 for an ambulance if required.
If you are on your own, leave the casualty and go for help if you cannot call 000.
Observe and reassess the casualty regularly for breathing and the feeling of warmth in their hands for circulation.
No Response?
If the casualty does not respond or gives a poor response, such as a confused verbal response:
Shout for help or call 000.
(D.R.S.) Send for Help
If there are no clear signs of a response to your touch and talk, stop and call for emergency assistance. If there are bystanders instruct them to make the call to allow the experienced persons to remain with the casualty.
Calling for HELP:
1/ Call 000 for Ambulance, Police or Fire Service.

2/ Call 112 if you are using a mobile phone and you are out or range of your telecommunications provider (a black spot).
3/ When the emergency operator answers, state clearly which service is required.
4/ Stay calm and speak clearly. Be ready to answer questions.
5/ State the location (your location is identified through a GPS method on your mobile phone), describe the emergency, number of casualties involved, condition of casualties, hazards – fire, fumes, chemical spill and telephone number where the caller can be contacted for further information.
6/ Do not hang up until told to do so by the operator.
(D.R.S.A.) Airway
To Check Airway:
Open the mouth gently without moving the head or the neck at this early stage incase there has been any injuries to the spinal cord.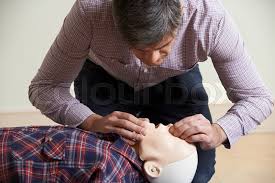
Airway Management
When a casualty becomes unconscious their muscles including the tongue and the soft tissue of their throat relax. Particularly if a casualty is lying on their back, this relaxed tongue falls back and blocks the airway preventing air reaching the lungs.
Airway obstruction in an unconscious casualty can be caused by the tongue becoming relaxed and falling backwards and foreign material such as vomit, food or blood. The casualty is unable to swallow or cough out the foreign material and to prevent obstruction all foreign material must be removed. The only way a first aider can remove any obstruction at the back of the throat is to roll the casualty onto their side using what is called a hip and shoulder roll. Special care should be taken if there is a risk of spinal cord damage.

including a suspected spinal injury.
(D.R.S.A.B.) Breathing (Checking for Breathing)
After an unconscious casualty’s airway has been assessed as clear, use the look, listen and feel technique to check for normal breathing. This step should not be rushed as you might miss the signs, take at least 15-20 seconds, and if breathing is NORMAL you should see between 4-5 rises and falls of the chest in that time.
Put your cheek near the casualty’s mouth and nose. Look down and along the chest and:
- Look – for the rise and fall of the chest.
- Listen – for any sound, any breathing.
- Feel – for the movement of air from the nose and mouth against your cheek, and place your hand on the casualty’s chest to feel for the rise and fall.
In the first few minutes of a casualty’s cardiac arrest, sounds of gurgling, sighing or coughing may be present, as well as movements of the chest and stomach. This type of breathing is ineffective, as it does not move air into or out of the lungs and the casualty should be treated as if they are not breathing.
Breathing may be absent or ineffective as a result of:
 Brain damage.Upper airway obstruction.Paralysis or impairment of nerves and/or muscles of breathing.Respiratory problems.Immersion.Cardiac arrest.
If you are not sure if a casualty is breathing normally, treat as if they are not breathing.
(D.R.S.A.B.C.) Compressions
Cardiopulmonary Resuscitation (CPR) is the technique of compressing the chest to move oxygenated blood around the casualty’s body and inflating the lungs with your breath to provide a supply of oxygen to the casualty. Without oxygen being delivered to the body’s cells they will begin to die within 3 to 5 minutes and by 7 to 11 minutes without oxygen the brain is damaged past the point of repair. These simple techniques will either restart normal heart/lung action or maintain circulation sufficient to preserve brain function until medical assistance arrives.
The two main components of conventional CPR are chest compressions to make the heart pump and mouth-to-mouth ventilation to breath for the casualty. Hands-only CPR is a form of resuscitation that involves continuous, rapid chest compressions only, and although effective, if not done correctly it is not as beneficial.
Commence CPR if the signs of breathing are abnormal.
CPR requires the first aider to give 30 compressions followed by 2 breaths (1 cycle).
Chest Compressions
Compressions are performed with the casualty laying on a firm surface; the floor is suitable for an adult. In the case of a small infant compressions are best performed on a table or similar surface. This will ensure the resuscitator is as comfortable as possible and can continue until medical assistance arrives.
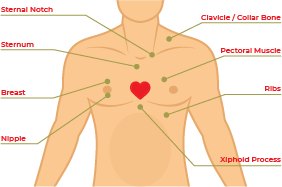
Locate the “centre” of the chest – this is the lower bottom half of the sternum
 Adult, Children and Infants
1 Kneeling beside the casualty with one knee level with the chest and the other knee level with the head.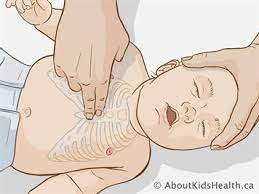
2 Locate the lower half of the sternum in the centre of the chest.
3 Place the heel of one hand on the lower half of the sternum (breastbone) and place the heel of the other hand on top of the first hand, interlock fingers of both hands and raise fingers to ensure that pressure is not applied over casualty’s ribs, upper abdomen or bottom part of the sternum.
4 Position yourself vertically above the casualty’s chest.
5 With straight arms, press down on the sternum (breastbone) to depress approximately one third of the depth of the chest. Compressions should be given at a rate of almost 2 per second. You should achieve 5/6 cycles of 30 compressions and 2 breaths in 2 minutes.
6 Repeat to complete 30 compressions at a rate of approximately 100/120 per minute.
Special Considerations in CPR
Pregnant Casualty
A woman in advanced stage of pregnancy (20 + weeks) requiring CPR should be positioned on her back with shoulders flat on the ground. Place padding under her right buttock to tilt the pelvis to the left. This takes the baby off the main blood supply back to the heart (the Inferior Vena Cava). If padding is not available to achieve a definite tilt, a second person should gently tilt the hips to the left side while CPR is being performed.
Rescue Breathing
On breathing in , a person inspires approximately 21% oxygen, and the body uses between 4-5% of this amount for its normal functions. Therefore, when a person breathes out (expiration) they expire approximately 16% of oxygen.
If an unconscious casualty is not breathing normally after the airway has been opened and cleared, compressions must be given at a rate of nearly 2 per second. If there is still no signs of response begin rescue breathing. Rescue breathing is when the first aider delivers air/oxygen into the mouth of the casualty (mouth-to-mouth resuscitation). It is an effective way to provide oxygen to a non-breathing casualty.
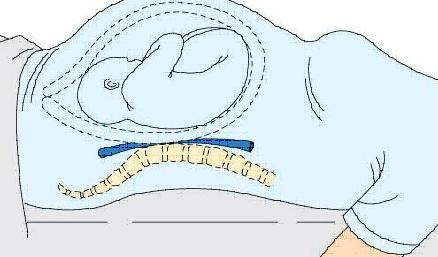
Place one hand on the casualty’s forehead or top of the head.
- With the other hand place your thumb over the chin below the lip and supporting the tip of the jaw with the knuckle of the middle finger. The hand is held in a pistol grip fashion with the index finger lying along the jaw line. Be careful to prevent the ring finger from squashing the soft tissues of the throat as this may block the airway.
- In children one to eight years of age, the head should only be given a half tilt backwards.
- In infants, younger than one year of age, the head should be kept in a neutral position DO NOT tilt the head.
- Gently pull the casualty’s jaw up towards you using a pistol grip, as you are extending the jaw slide the head backwards into a tilt. The head is tilted backwards, NOT the neck.
- Seal their mouth with yours, blow until you see a rise of the casualty’s chest indicating movement of air to the lungs
- By combining correct head tilt and effective chin lift, you open and clear the airway and reduce the risk of regurgitation.
There are three types of head tilt used in resuscitation:
- Neutral – used for infants (0-1 years) and casualties who have a suspected spinal injury.
- Half tilt – used for young children (1-8 years).
- Backward – used for older children and adults (8 years and upwards) .
Rescue Breathing Techniques
Using the Mouth-to-Mouth Rescue Breathing method.
The first aider seals the casualty’s mouth with their own mouth, and then blows air into the casualty’s mouth pinches the nose closed if air leaks from the nose.
Mouth-to-Nose Rescue Breathing
This is the preferred technique for resuscitation in an infant or small child where your mouth seals the nose and the mouth together. This ensures a perfect seal so that no air is lost through the nose.
Mouth-to-Mask Rescue Breathing 
This technique requires a resuscitation mask (CPR face shield). It prevents mouth-to-mouth contact between the first aider and the casualty. This technique is recommended if the casualty has vomited, there is blood present, the casualty is intoxicated or unknown to you. The mask is fitted firmly over the casualty’s mouth and nose and the first aider delivers breaths via a valve or tube that prevents direct contact with the casualty’s skin or expired air.
- Infant – Less than 1 year of age.
- Child – Between 1 to 8 years of age.
- Adults – 8 years of age and older.
Only deliver enough breath to a casualty to make their chest rise.
- Place them on their side in the recovery position and maintain neck stability.
- Re-check the casualty’s airway and breathing regularly.
- Check for other injuries.
Identify and immediately control any severe bleeding. This simply requires the casualty to be scanned from head to toe to detect signs of external bleeding. Bleeding is considered severe when it is spurting or cannot be controlled. Such severe bleeding is a life-threatening condition that must be addressed as quickly as possible.

(D.R.S.A.B.C.D) Defibrillation
Attach an Automated External Defibrillator if available and follow the voice prompts.
An AED is an electronic device that automatically analyses the casualty’s heart rhythm, an AED will not shock if the Heart has completely stopped (Cardiac arrest). If it detects a problem that may respond to an electrical shock, it permits a shock to be delivered in an attempt to restore a normal heart rhythm.
- Send someone for the AED.
- If there is more than one first aider present, assign tasks for each.
- Turn on the AED.
- Attach the electrode pads. If there is another first aider, continue chest compressions while the pads are attached.
- Follow the voice/visual prompts of the AED.
- Ensure that nobody touches the casualty while the AED is analysing the rhythm.
Pad Placement for Adults
Place pads on the exposed chest with 1 pad near the top of the right side of the chest and the other below the left bottom of the chest, the pads will have a diagram to sure you where to position, if placed in the wrong place the AED will advise you. “Adjust Pads-Adjust Pads” until you have found the correct position. In large-breasted individuals it is reasonable to place the left electrode underneath the left breast, avoiding breast tissue. All pads have a diagram on the outer covering demonstrating the area suitable for pad placement.
Pad to skin contact is important for successful defibrillation. There may be a need to remove moisture or excessive chest hair prior to the application of pads but emphasis must be on minimizing delays in shock delivery.
Avoid placing pads over implantable devices. If there is an implantable medical device the defibrillator pad should be placed at least 8 cm from the device. Do not place AED electrode pads directly on top of a medication patch because the patch may block delivery of energy from the electrode pad to the heart and may cause small burns to the skin. Remove medication patches and wipe the area before attaching the electrode pad.
Pad Placement for Children
Standard adult AEDs and pads are suitable for use in children older than 8 years. Ideally, for children between 1 and 8 years paediatric pads and an AED with a paediatric capability should be used. These pads also are placed as per the adult and the pads come with a diagram of where on the chest they should be placed.
If a Shock is Indicated
- Ensure that nobody touches the casualty.
- Push the shock button as directed.
- Continue to follow the voice/visual prompts of the AED.
If No Shock is Indicated
- Immediately resume CPR.
- Continue to follow the voice/visual prompts of the AED.
AED Safety
The precaution and proper use of an AED is very important to ensure it operates effectively and prevents injury.
The AED operator is responsible for using the AED in a safe manner.
First Aiders and Bystanders
Keep your hands off the casualty while performing defibrillation.
Also make sure no-one else touches the patient. If these rules are not respected, you or others might get an electric shock. Touching the patient while the AED performs the analysis will not give accurate results.
- Clearly and loudly state “don’t touch the casualty” or “stand clear”.
- Look to ensure that no one is touching the casualty before pressing the shock button.
Transport
The AED device should be used with great care if the casualty is being transported. The movement of a vehicle may affect the ability for the AED to analyse the casualty and consequently affect its performance.
Surgical Implants
If a casualty has an electronic pacemaker or cardioverter implanted under the skin, ensure that the AED chest pad is positioned at least 10 cm away from the pacemaker.
Ensure that the pads are not placed over a Glyceryl Trinitrate patch (GTN).
Beware of moisture.
Before performing the defibrillation, make sure the chest of the patient is completely dry. In the AED kit you will find a cloth that is provided for the purpose of drying the casualty’s chest. Sweat or water spots make certain parts of the chest less resistant and the defibrillation might not be very effective. Also, the presence of water may lead to burns. Make sure that the casualty has no contact with water. If the casualty is in a pool or outside in wet weather remove them to a safe shelter and dry the chest before taking any further action.
DO NOT use alcohol wipes to dry the chest of the casualty as it is very flammable.
Gaseous and Oxygen-Rich Environments
Defibrillators can cause sparks. If using oxygen to supplement resuscitation, ensure that there is no concentration of oxygen around the casualty’s chest. Ensure that there is no build up of other gases around the scene.
If the casualty shows Signs of Life, roll them onto their side, treat any other injuries and continue to monitor their airway, breathing and circulation until the ambulance arrives. If the casualty is breathing and unconscious place on their side in the recovery position, check for and manage any other injuries until the ambulance arrives.
REMEMBER
Any Attempt at Resuscitation is Better Than None.